
Understanding Paint Thickness & the Importance of Paint Thickness Readings
Taking a Step Back
In my previous post, I covered the fundamentals of interior and exterior detailing. These essential services are ideal for beginners since they pose minimal risk to the vehicle. Before advancing to techniques such as in-depth polishing, paint correction, wet sanding, and ceramic coatings, I strongly recommend thoroughly understanding these basics. Advanced processes carry a significant risk of paint damage—even for experienced professionals—let alone beginners.
Why Understanding Paint Thickness is Critical
Before attempting heavy polishing, paint correction, or wet sanding, it’s essential to familiarize yourself with one of the most important tools in the process—arguably even more important than the polisher itself: the paint thickness gauge.
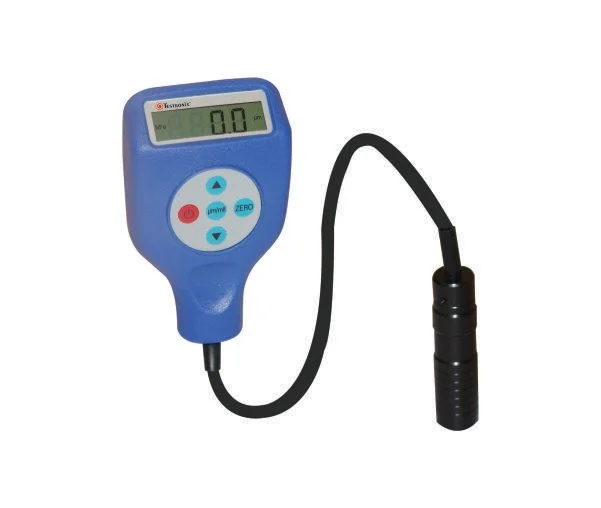
Why Is a Coating/Paint Thickness Gauge So Important?
Every time you polish, correct paint, or remove scratches, you are removing a thin layer of clear coat—or, in the case of single-stage paint, the paint itself. Remove too much, and you’ll burn through the paint, exposing the bare metal underneath—a detailer’s worst nightmare.
A paint thickness gauge measures the total thickness of the primer, base coat, and clear coat between the probe and the vehicle’s metal body. This helps determine how much paint remains in a particular area, significantly reducing the risk of costly burn-through during paint correction or wet sanding.
Light polishing typically doesn’t remove enough clear coat to cause a burn-through. However, I highly recommend testing the paint thickness before any polishing, as some vehicles may have dangerously thin paint. In rare cases, even the lightest polish can lead to burn-through if the paint is already compromised.
Why You Should Always Use a Paint Thickness Gauge
A paint thickness gauge is especially important when working on older vehicles. You never know how many times a car has been polished before or how much clear coat remains. Additionally, some modern vehicles have thinner paint, as many manufacturers have started using less paint to reduce costs.
How Accurate Is a Coating/Paint Thickness Gauge, and Does It Always Work?
Accuracy of Paint Thickness Gauges
The accuracy of a paint thickness gauge varies by manufacturer and model. High-end gauges claim precision within ±0.01 mils to ±0.0001 mils, and generally, the more expensive the gauge, the more precise it tends to be.
For most detailing professionals, a mid-range paint thickness gauge—costing around $200—provides reliable accuracy. However, high-end detailers working on luxury or exotic vehicles, where a single mistake could cost thousands, often use premium gauges priced between $800 and $1,600 for the highest precision.
If you’re just starting out or on a budget, entry-level gauges in the $50 to $100 range can still provide useful readings. Be sure to research different options to find the best fit for your needs.
Additionally, proper calibration is essential. Always calibrate your gauge when you first receive it and periodically over time to ensure continued accuracy. Most coating thickness gauges come with calibration shims that allow you to verify readings and recalibrate according to the manufacturer’s instructions.
Does It Always Work?
Paint thickness gauges only function on ferrous (iron, steel) and non-ferrous (aluminum, zinc, copper, tin) metal surfaces, which include most car body panels.
However, they do not work on non-metal surfaces such as:
Composite plastics
Vinyl
Carbon fiber
Fiberglass
This means that paint thickness gauges cannot measure coatings on plastic bumpers, as there is no metal underneath for the probe to read. So, when polishing or correcting paint on bumpers, you’re essentially flying blind without a way to measure the remaining clear coat thickness.
How Thick Is Automotive Paint?
Short answer: It varies.
Long answer: Paint thickness depends on factors such as the manufacturer, vehicle year, make, model, color, and even changes in paint suppliers within the same production year. Additionally, previous detailing, bodywork, or DIY polishing may have removed varying amounts of clear coat, further affecting paint thickness.
To ensure safety, always use a paint thickness gauge and begin with the least aggressive method, conducting a test spot in an inconspicuous area.
As a general rule, assume that less than ¼ of the total paint measurement is clear coat, but keep in mind that clear coat thickness varies by panel and location.
Understanding Paint Thickness Measurements
Before diving into general paint thickness values, let’s define some key measurement units.
Units of Measurement
Mil (U.S. Standard): One-thousandth (0.001) of an inch (0.0254 mm), commonly used to measure coatings and films.
Micron (Metric Standard): One-millionth of a meter (approximately 0.000039 inches). For reference, the average human hair is about 50 microns (2 mils) thick.
Common Automotive Paint Thickness Ranges
While values can vary, here are some rough approximations:
Total Paint Thickness: ~3 to ~4 mils (~80 to ~100 microns) – about as thick as a dollar bill.
Clear Coat Thickness: ~1.57 to ~2.36 mils (~40 to ~60 microns).
Edges: Typically 25-50% thinner than flat panels.
Some edges may be as thin as 1.8 to 2.5 mils (~46 to 63 microns).
The clear coat on edges could be as thin as 0.9 to 1.25 mils (~23 to 31 microns) compared to flat panels at 3-4 mils (~80-100 microns) total thickness.
🔹 Key Takeaway: Be extremely cautious around edges when polishing, and avoid aggressive wet sanding or correction on edges.
Paint Layers & Paint Thickness Gauge Readings
A paint thickness gauge measures the total thickness of all paint layers (primer, base coat, and clear coat) combined. However, it does not differentiate between layers. This is why it's essential to always start with the least aggressive method before proceeding.
A rough breakdown of typical paint composition:
~25% Primer: (~0.78 - ~0.98 mil / ~20 - ~25 microns)
~35% Base Coat: (~1.10 - ~1.38 mil / ~28 - ~35 microns)
~40% Clear Coat: (~1.26 - ~1.57 mil / ~32 - ~40 microns)
⚠️ Important: These values are not universal. Always use a paint thickness gauge before performing paint correction, and assume variations between different paint layers, vehicles, panels, colors, and manufacturers.
Final Thoughts
I hope this post expands your understanding of paint thickness and helps you approach paint correction more safely. Proper knowledge and preparation can prevent costly mistakes while achieving professional results.
⚠️ Disclaimer: Attempt detailing at your own risk. Extensive Detailing LLC holds no liability for damages or injuries caused by following the information in this blog.